Kubernetes Clusters
RESVRL provides a managed Kubernetes workflow that lets you get a ready-to-use cluster without building every node manually. This guide follows the actual Portal console flow: navigation, list page, creation form, and post-delivery operations.
Kubernetes Clusters
RESVRL provides a managed Kubernetes workflow that lets you get a ready-to-use cluster without building every node manually. This guide follows the actual Portal console flow: navigation, list page, creation form, and post-delivery operations.
Where to start
- Sign in to the member console.
- Open Kubernetes from the left navigation.
- The default view is the cluster list page.
The list page displays:
- Cluster name — click to open cluster details.
- Cluster status — Creating, Running, Failed, or Deleting, shown with color indicators.
- Kubernetes version
- Node counts — control-plane and worker nodes.
- Cluster health
The top toolbar supports creating a cluster, refreshing the list, and batch-deleting clusters.

What the platform creates for you
When you create a cluster, the platform provisions:
- A control plane whose size is automatically derived from the worker count.
- A configurable number of worker nodes.
- An optional gateway node for external traffic.
- A dedicated cluster network.
- A cluster management workspace with Overview, Nodes, Workloads, Networking, Storage, and Access Control pages.
- A YAML import action on the cluster detail page.
Before you start
Prepare the following:
- A target region and host group with available capacity.
- A virtual network for internal cluster communication.
- If external traffic is needed, a gateway network and associated security group.
- An estimate of worker CPU, memory, storage, and peak node count.
Create a cluster
- On the Kubernetes list page, click Create.
- Select the region group and host machines.
- Enter the cluster name.
- Confirm the Kubernetes version (typically 1.30).
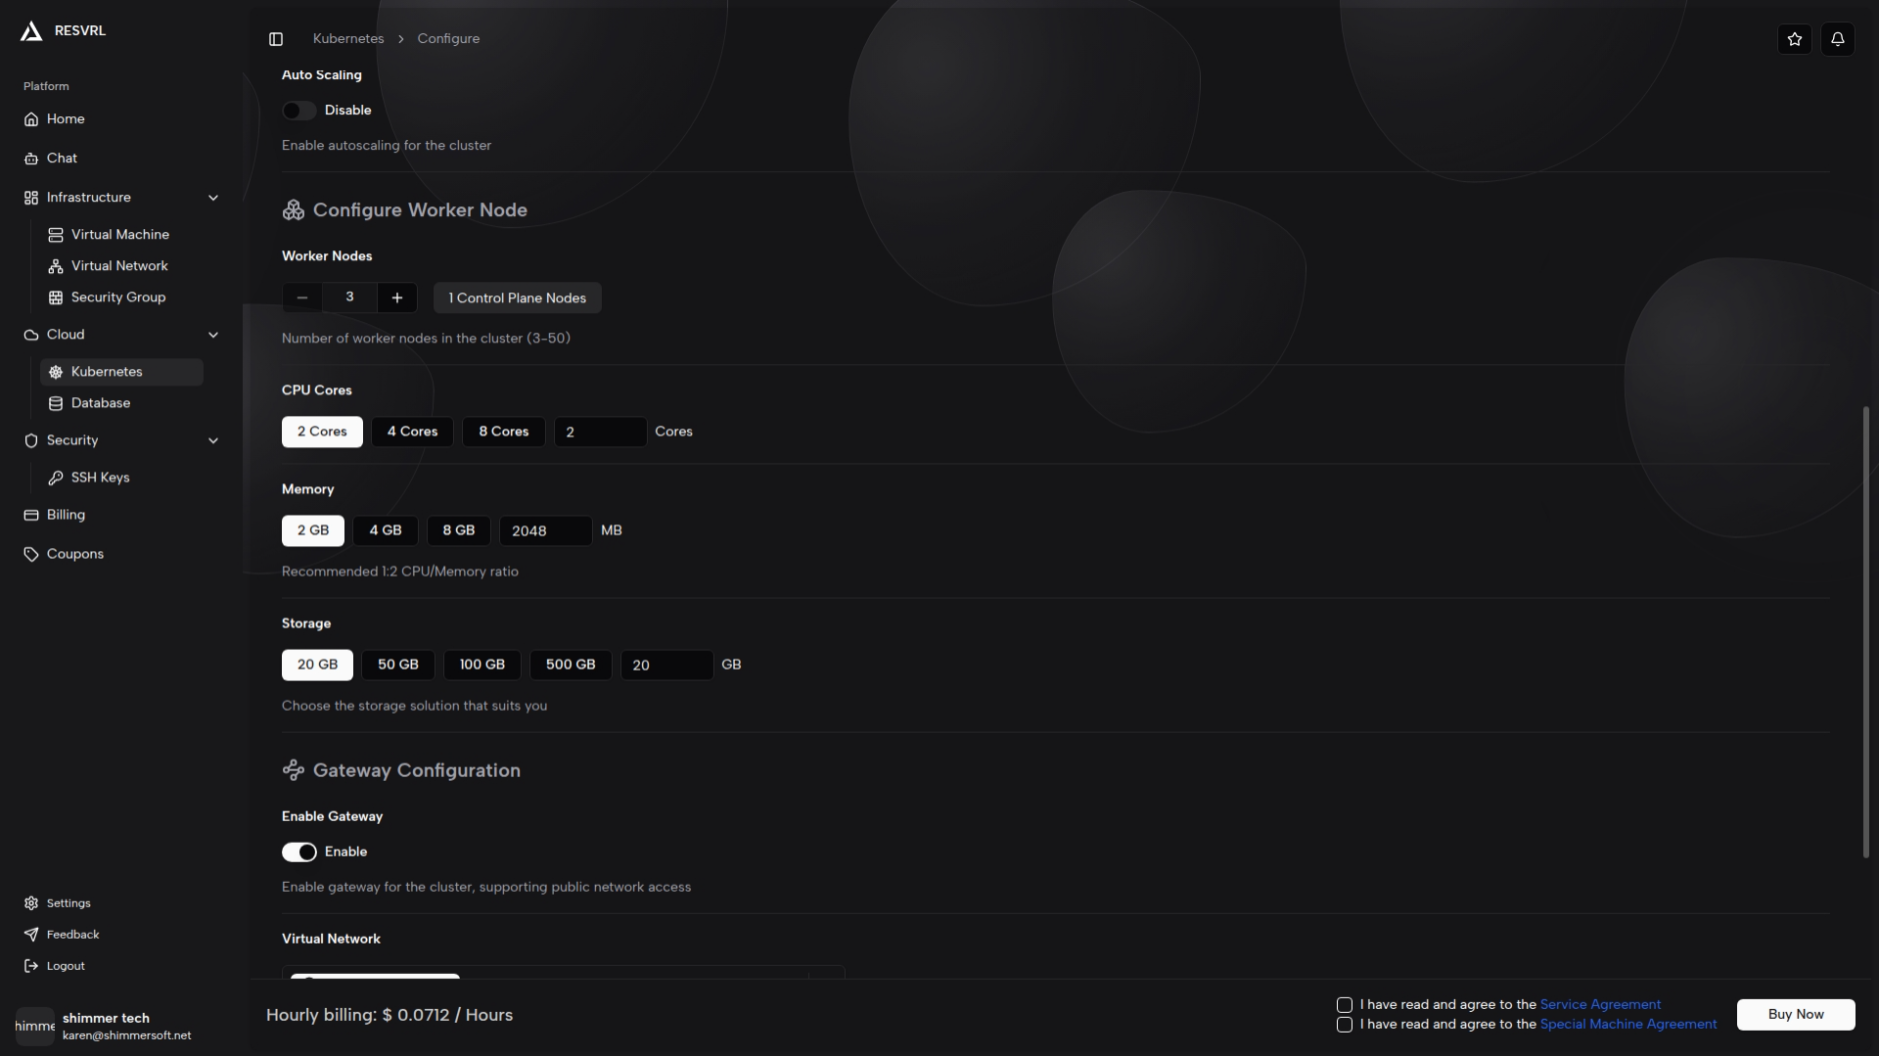
- Set the worker-node count.
- Configure worker CPU, memory, and system disk.
- Decide whether to enable auto scaling; if enabled, set the maximum node count.
- Select the internal cluster network.
- Decide whether to include a gateway.
- If gateway is enabled, configure gateway bandwidth and related network settings.
- Review the price calculation and configuration summary.
- Submit and wait for provisioning.
Key configuration options
Worker nodes
- Defaults to a beginner-friendly size, adjustable during creation.
- CPU, memory, and storage determine the workload capacity.
- Control-plane sizing is automatically derived from the worker count.
- Modifying node count or size triggers a price recalculation — review the total before submitting.
Auto scaling
- Can be enabled during creation. When enabled, set the maximum node count.
- Budget planning should account for the maximum scale, not just the initial count.
Cluster network
- Required field.
- Use a private network when workloads only need internal communication.
- Avoid sharing the network with unrelated environments.
Gateway
- Optional. Enable when workloads need external exposure.
- Requires a matching network and security group.
- Gateway bandwidth affects external traffic capacity — size it for expected traffic.
Check status after creation
After submission, return to the Kubernetes list page to monitor status:
- Creating — nodes and platform components are being provisioned.
- Running — the cluster is ready for workloads.
- Failed — provisioning did not complete. Check orders, notifications, or contact support.
- Deleting — the cluster is in the removal workflow.
If the latest state does not appear immediately, use the toolbar refresh button.

Console features after provisioning
Overview
View cluster version, region, total nodes, ready status, pod counts, and aggregate CPU, memory, and disk usage. Use this page to confirm the cluster is fully ready.
Nodes
- Filter by role and status.
- Check node IP, version, resource pressure, and uptime.
- Cordon and uncordon nodes during maintenance.
- Verify node readiness first when troubleshooting issues.
Workloads
Browse Pods, Deployments, StatefulSets, DaemonSets, Jobs, and CronJobs. Check workload status before applying changes; if a replica fails to start, locate the issue from this page.
Networking
- Review Services, Gateway resources, and Network Policies.
- When exposing services, verify network paths alongside security groups.
- For public-facing services, validate gateway, Service, and security-group configurations together.
Storage
Review PVCs and StorageClasses. Confirm storage resources are available before deploying stateful applications.
Configuration and Access Control
Inspect Namespaces, ConfigMaps, and Secrets. Review ServiceAccounts, Roles, and their bindings for access control.
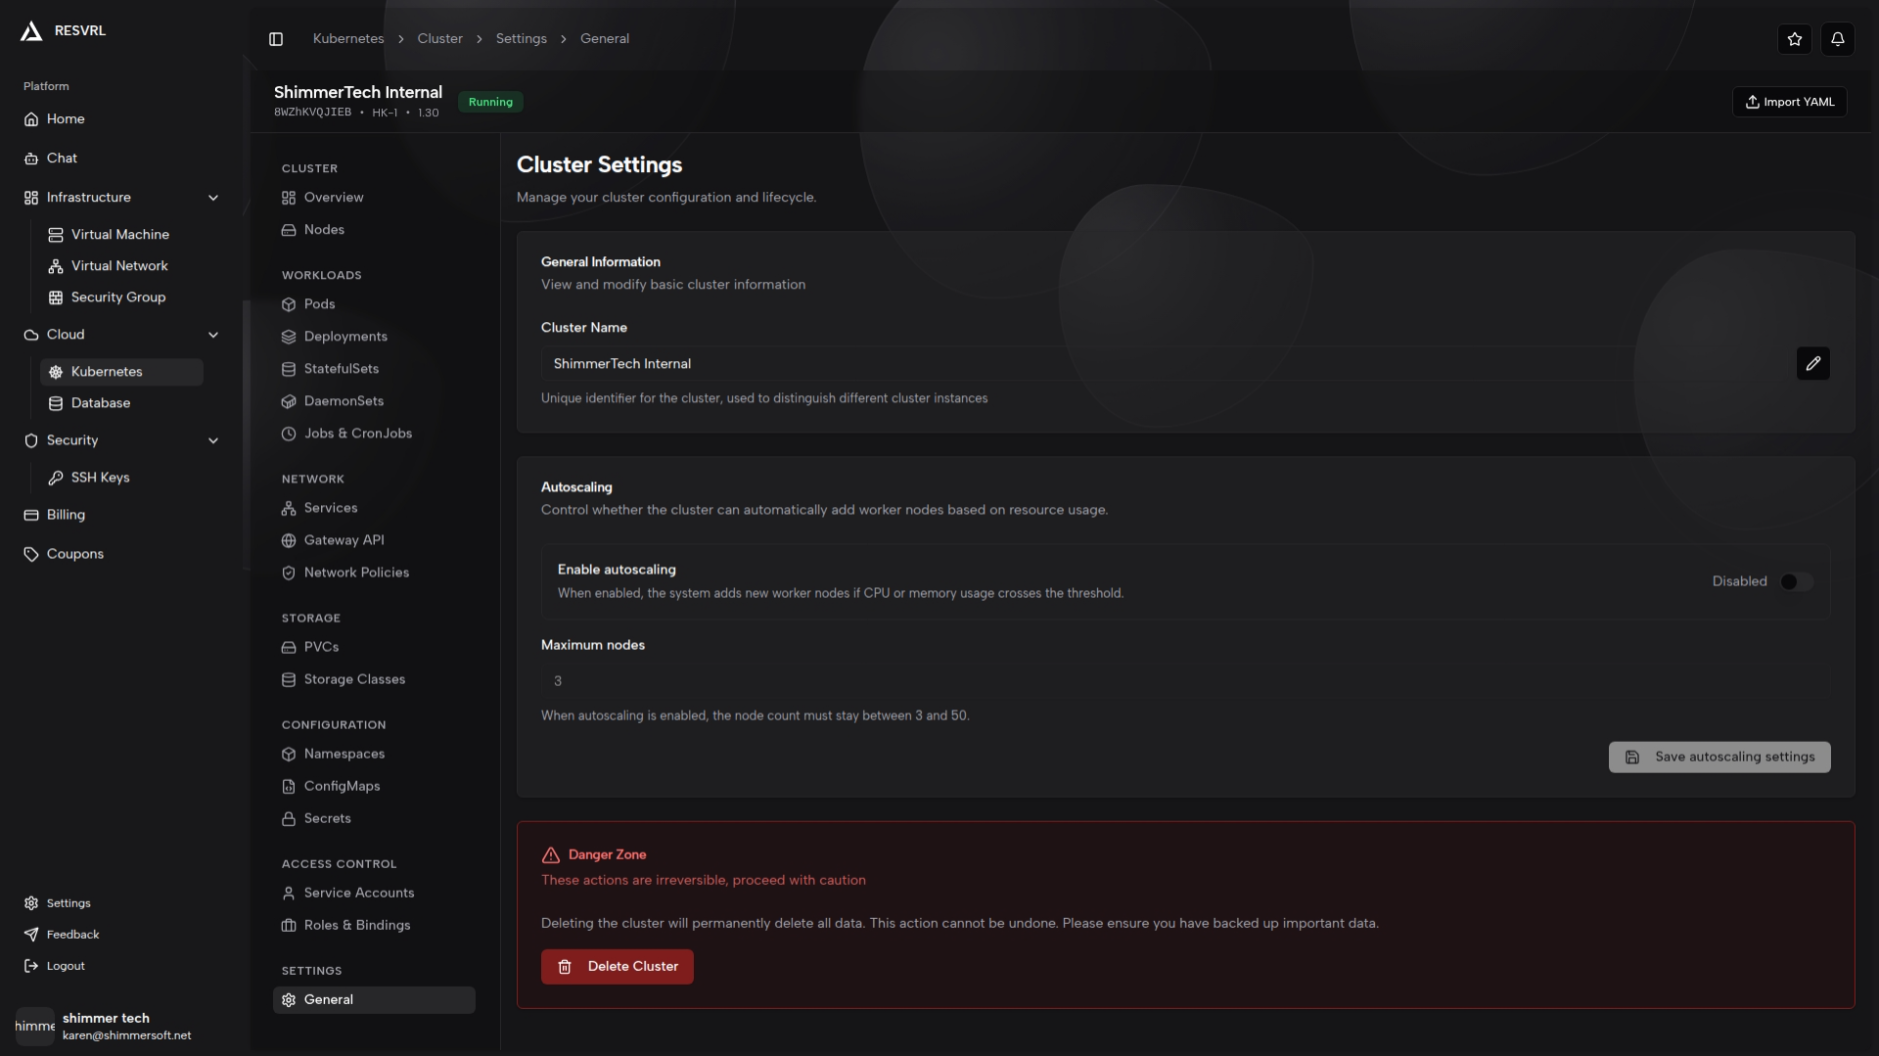
Settings
View cluster-level configuration and maintenance actions. Apply changes as guided by the page.
Import YAML
The Import YAML feature is located in the cluster detail page header via the "Import YAML" button. Clicking it opens a side panel with a code editor for pasting YAML content. Use --- to separate multiple resources, then click "Apply YAML" to deploy resources to the cluster. The apply operation executes immediately, so ensure the YAML conforms to the Kubernetes API specification.
Import YAML only supports creating or updating resources; it does not support deleting resources.
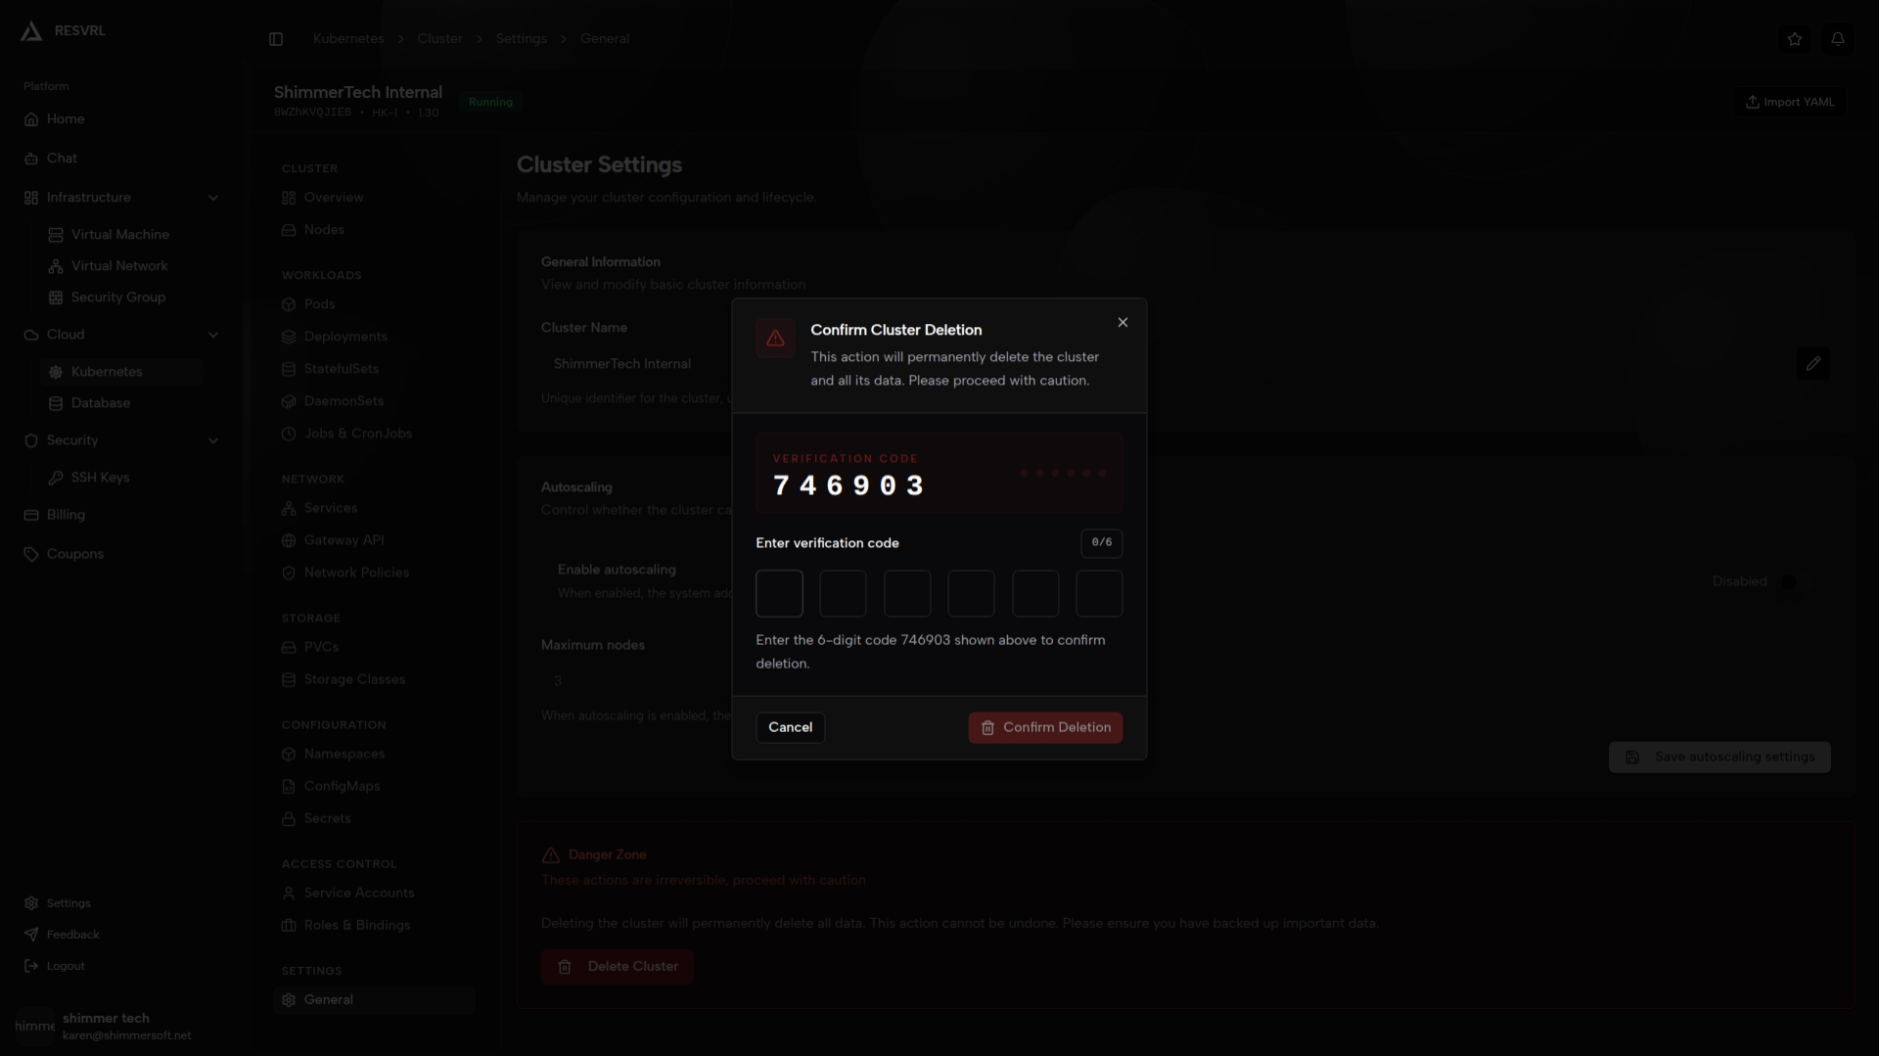
Delete a cluster
- Return to the Kubernetes list page.
- Select one or more clusters.
- Click Delete.
- Confirm the action in the dialog.
The cluster enters Deleting status after deletion and is removed from the list once all resources are cleaned up. Deletion is irreversible and cleans up associated VMs, network configurations, and storage — ensure all important data is backed up beforehand.
Operational guidance
- Start with the smallest viable worker size and scale up based on monitoring.
- Use a dedicated security group for the gateway to avoid overly permissive rules.
- Keep private workloads on the cluster network and expose only necessary entry points.
- Check node readiness and resource pressure before scaling workloads.
Important notes
Creation process
- Nodes are created sequentially: the first must be a Control Plane node, followed by Worker nodes one by one.
- Only one node per cluster can be in the CREATING state at a time; parallel creation is not supported.
- If a node fails to create, subsequent nodes will not be created and the cluster may enter Failed status.
- Creation typically takes 10–15 minutes. On completion, a notification is shown and the page navigates to cluster details.
- Do not re-submit or refresh the page during creation.
Metrics
- Resource utilization in the Overview (CPU, memory, disk) requires metrics-server to be installed; otherwise, values show as N/A.
- Node load charts and Pod status charts also depend on metrics data.
Networking
- Clusters run on an internal network; external access to internal services is not possible directly.
- External traffic requires a Gateway.
- Gateway requires matching network and security group configuration.
Billing
- Pay-as-you-go clusters are billed hourly.
- With auto scaling enabled, costs are based on actual node count — monitor the maximum for budget control.
- Expired clusters are automatically deleted by the platform.
Deletion
- Deletion is irreversible. Back up all critical data before proceeding.
- The cluster shows as Deleting until all resources are cleaned up and removed from the list.
- Deleting a cluster also cleans up associated VMs, networks, and storage resources.
Common questions
When should I enable the gateway?
Enable the gateway when cluster services need to receive external traffic, such as websites, APIs, or unified ingress endpoints.
Do I need a security group for every cluster?
Not for internal cluster communication. A security group is required when enabling a public-facing gateway.
Can I manage workloads from the console?
The console provides views for workloads, nodes, storage, networking, and access control for routine operations. You can still use standard Kubernetes tooling for application delivery workflows.
Why does the create page show only one Kubernetes version?
The platform only exposes validated versions (e.g., 1.30). Contact support if you need a different version.
Related docs
This document was updated on 2026-04-25 09:00